On The Road Again (OTRG)… R80 G/S & R65LS 40th Anniversary Rally

Gonzo (my 1977 R100RS) and I are going to be on the road again on our way to Todd Trumbore’s home where he is hosting his third airhead 40th anniversary celebration of bikes designed by the legendary Hans Muth, on September 19-22, in Harleysville, PA. (Yes, an ironic location for a BMW airhead rally 🙂 ) This time Todd is celebrating 40 years since the introduction of the iconic R80 G/S and the R65LS models in 1979. Once again, Hans will be in attendance along with a notable list of other airhead and motorcycle legends who will be speaking.  You can see the details here:

–> 40TH ANNIVERSARY RALLY TO CELEBRATE LEGACY OF R 65 LS, R 80 GS

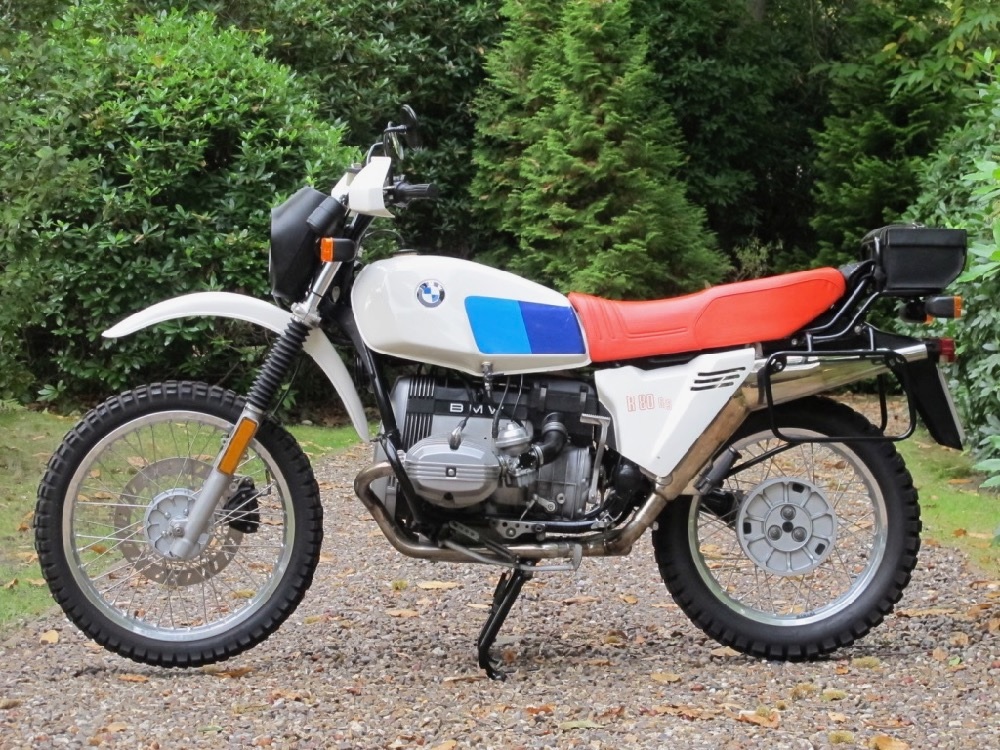
R 80 G/S Started the Adventure Bike Category

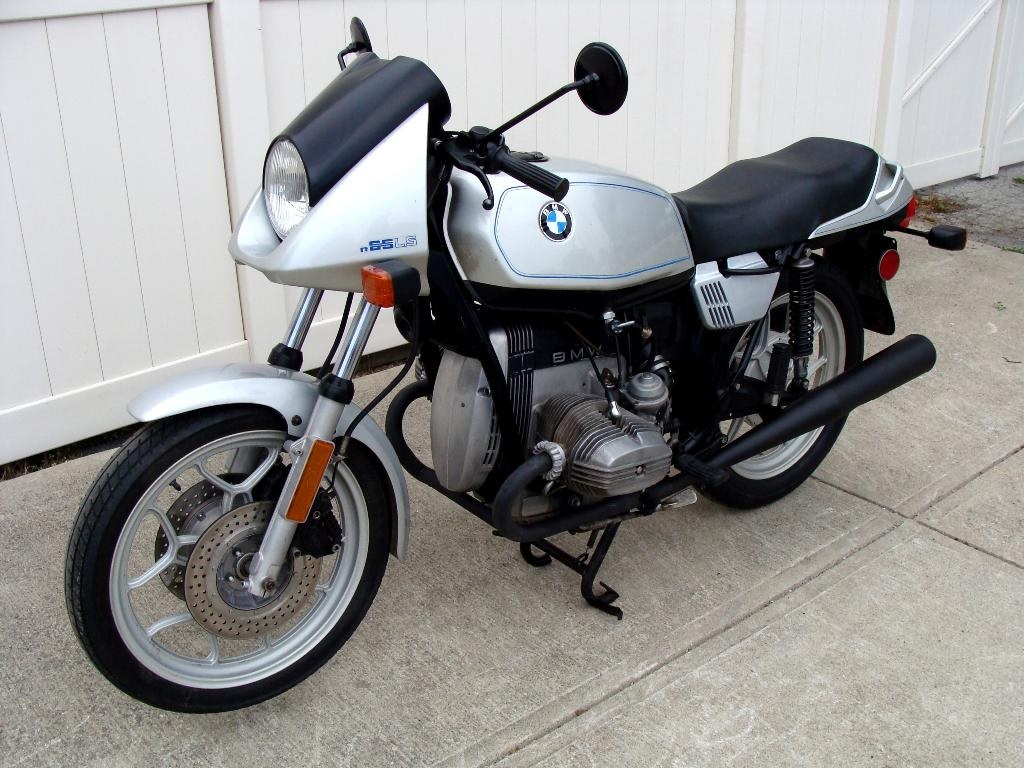
R65 LS – Distinctive, Minimalist Styling

The first rally Todd hosted was in 2014 for the R90S and the second was in 2017 for the R100RS, which is the rally Gonzo and I first attended. Even though my garage does not yet include an R80 G/S or R65LS, Todd was happy to let me attend the festivities despite riding “only” an RS.

The R80 G/S and R65LS are the last two designs Hans developed for BMW before starting a design studio, Target Design, with some friends, Jan Fellstrom and Hans-Georg Kasten. One notable design from the Target Design studio was the Suzuki Katana in 1980. I find the lines of the R65LS and Katana are similar, as if Hans extended the design vocabulary the BMW R65LS and to the design commissioned by Suzuki for the Katana.

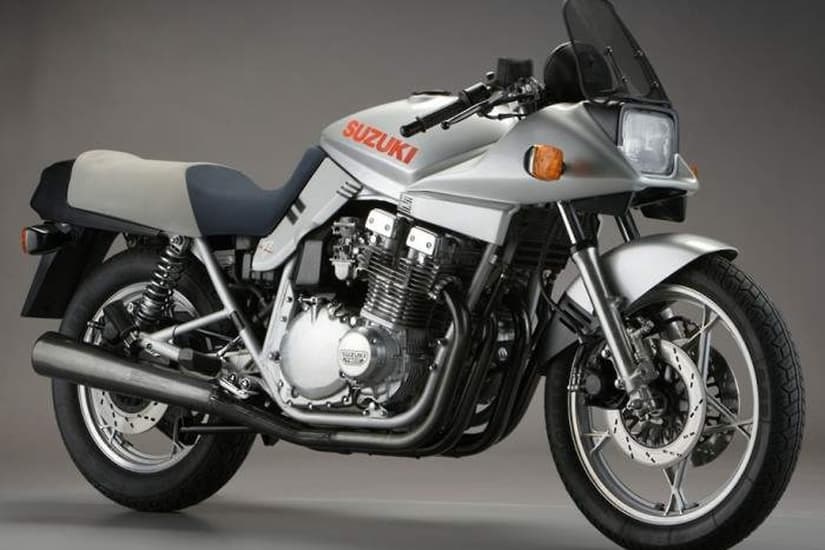
Suzuki Katana-To Me, It Echos The Design Vocabulary of the R65LS

When Gonzo and I went out in 2017, we had an adventure when the shift cam retaining circlip in Gonzo’s transmission came off the shaft. The BMW dealer I ordered it from supplied the wrong size circlip and I was not attentive enough to notice. Gonzo and I ended up being transported to the rally hotel by Scott Mercer with assistance from Tom Gaiser, and Keven O’Neil. Tom Cutter, at Rubber Chicken Racing Garage, one of the best airhead transmission re-builders, was a speaker at the rally and put Gonzo on his trailer while I followed him to his shop riding his “most excellent” R100 “Fake S” bike. He took apart the transmission on the Sunday after the 2017 rally while I watched and assisted with cleaning parts, and I was back on the road that Monday. Here is the story of my adventures going to the 40th anniversary of the RS rally in September 2017.

Although Gonzo and I are very appreciative of Tom’s generous assistance. we plan to avoid imposing on him again on this trip. 🙂

Since I \didn’t complete the entire trip last time in 2017, I am going to take the same route out and back this time. Somehow that seems appropriate.

Gonzo now has “matte” clear coat, which is correct for the 1977 RS bikes, but due to my failure to communicate with my painter, he was repainted with gloss clear coat back in 2017 when I did the restoration. He is also sporting the commemorative badge Todd provided to the participants of the 2017 R100RS rally. I think it’s a very nice touch and a lot classier than the cheap decal BMW originally used on the cowling in 1977.

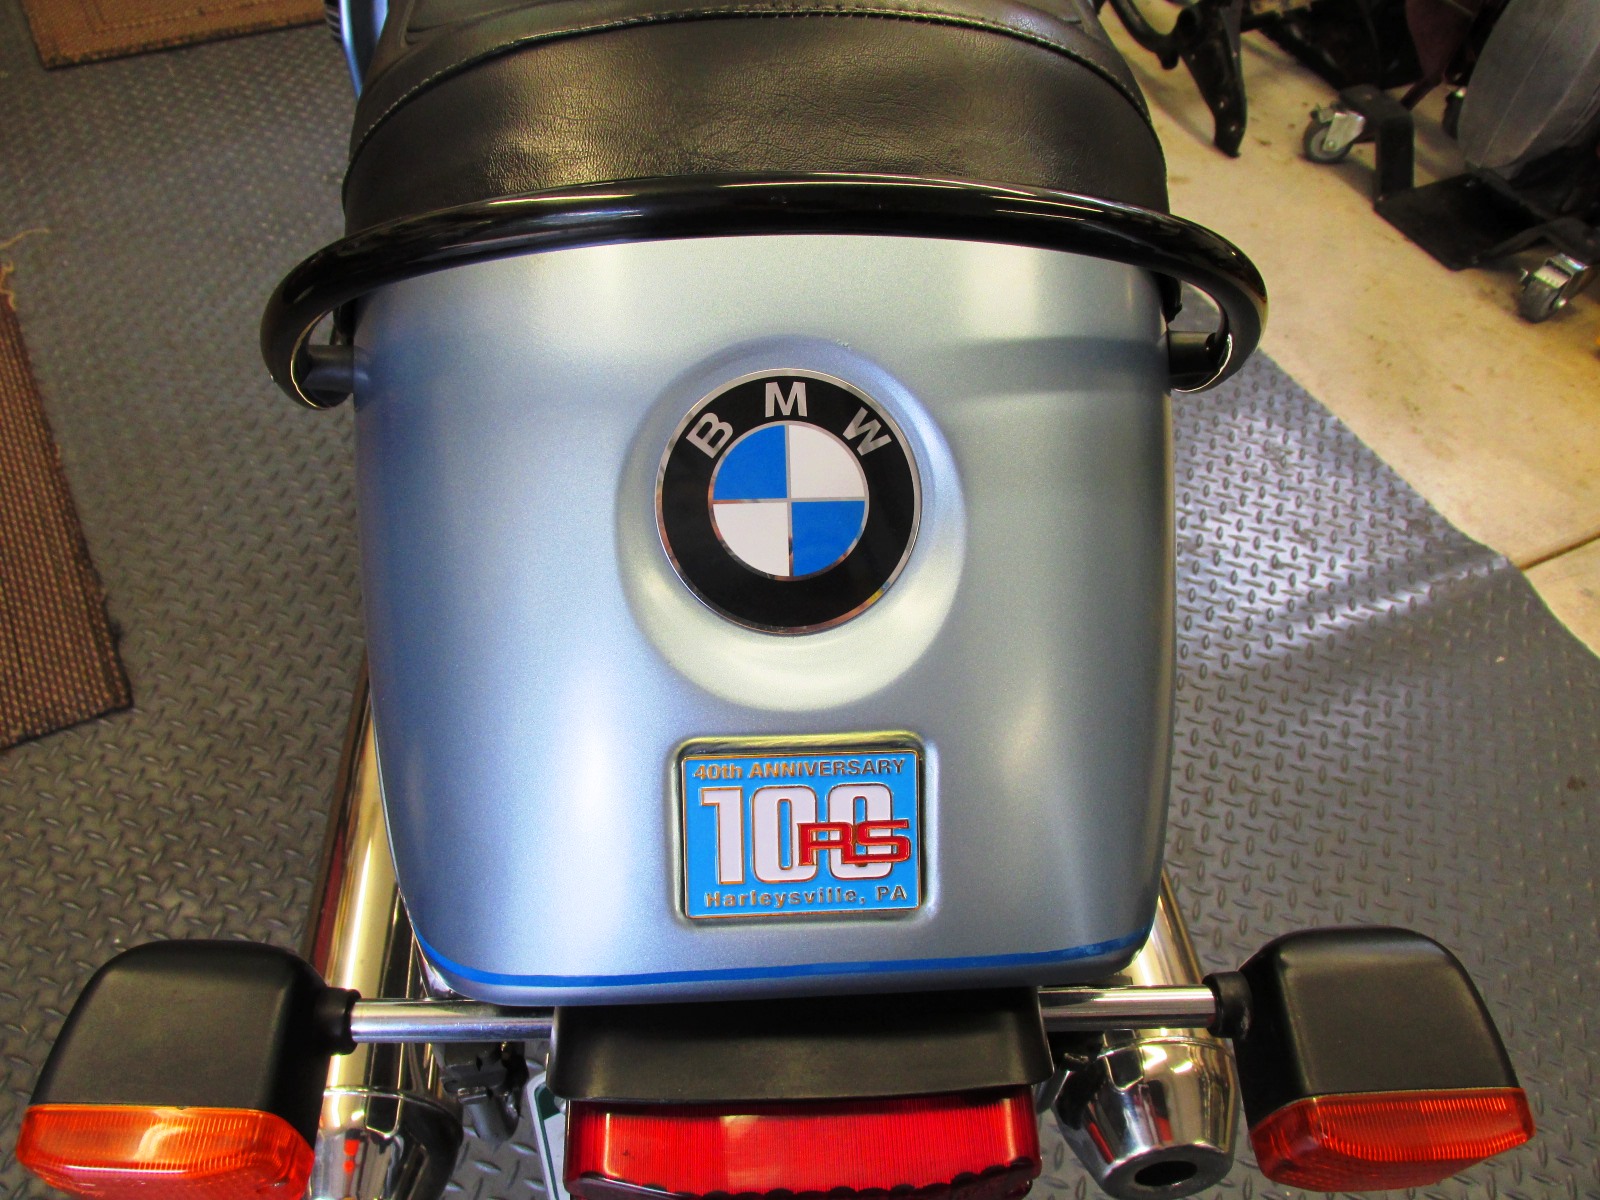
Gonzo ‘s Matte Clear Coat and Commemorative 40th RS Rally Badge

Rear Cowl With Original "Cheap" Decal BMW Used in 1977

Rear Cowl With Original “Cheap” Decal BMW Used in 1977

Gonzo and I are looking forward to attending this last of the 40th anniversary celebrations of Hans Muth designed BMW motorcycles.

Gonzo’s Excited to Go To Another Todd Trumbore Hosted 40th Anniversary Rally

1983 BMW R100RS Rebuild Master Cylinders & Brembo Calipers

This bike has a front master cylinder that is integrated into the Magura throttle assembly and a rear Brembo master cylinder. All three calipers are Brembo F-08 series with dual 38 mm pistons.  I disassembled both master cylinders and inspected them. I repainted and rebuilt the rear master cylinder using a Brembo rebuild kit. Unfortunately, I found the front Magura master cylinder bore and internals were badly rusted and pitted, so I had to replace the front master cylinder rather than rebuild it. Even though I didn’t have to rebuild the front master cylinder, I show how you rebuild it and the rear master cylinder in this document.

I also put together two short videos showing the work I did on the front and the rear master cylinders.

1983 R100RS Disassemble & Inspect Front Master Cylinder

1983 R100RS Disassemble, Inspect & Rebuild Rear Master Cylinder

I removed the brake calipers when I removed the brake system and you can see how to remove the calipers here:

I disassembled all three calipers, inspected them and found they were not corroded or pitted so I repainted and rebuilt them using a Brembo caliper rebuild kit. The same kit is used on all three calipers. You can see how I did that work here:

I also put together a video about how I rebuilt the calipers.

1983 R100RS Disassemble, Inspect & Rebuild Brembo Brake Calipers

1983 BMW R100RS Repair Broken Side Cover Tabs on Sub-Frame

For some reason both tabs that help hold the left side cover on are broken off on the Sub-frame.  I fabricated new ones out of some scrap steel lawn edging and had my son weld them to the sub-frame.

If you have to make this repair, here is how I made them.

Some pictures follow.

Sub-Frame Leg With Original Brackets

Right Sub-Frame Leg With Original Brackets

Sub-Frame Leg With Both Brackets Broken Off

Left Sub-Frame Leg With Both Brackets Broken Off

12 mm Socket For Finishing Round End Radius

12 mm Socket For Finishing Round End Radius

Use Drift in Vice To Form Radius At End of Bracket

Use Drift in Vice To Form Radius At End of Bracket

Brackets Ready For Welding

Brackets Ready For Welding

New Tabs-Just Like The Original

New Tabs Look Just Like The Original

New Tabs-Just Like The Original

New Tabs Look Just Like The Original


1983 BMW R100RS Remove Swing Arm Bearings

I’m going to powder coat the swing arm, and the bike has 83,000+ miles on it. So I am removing the swing arm bearings and will replace them.

BMW used two different style bearings on the airhead swing arm: an unsealed 30203 bearing that was changed part way through the 1981 model year (01/1981) to a sealed bearing, FAG 540619. Changes in the swing arm bearing assemble were made at the start of the 1981 model year (09/1980) when the pivot pin was shortened and the dust cap changed to accommodate the 30203 bearing with the shorter pivot pin. Then in January 1981, the sealed bearing was added with it’s included dust cap.

I’ve removed the 30203 bearings before using the tool from Cycle Works.

Cycle Works Bearing Puller Kit

Cycle Works Bearing Puller Kit

But it won’t fit inside the captive sleeve of the sealed bearing. And I can’t remove the inner race without a puller as it is captive due to the sealed bearing design. So I bought a set of blind bearing pullers for less than $60.00.

This kit has a slide hammer and a set of puller legs when more force–that will be required for the outer race extraction–is needed. There are various size expanding sleeves that cover a wide range of bearing diameters, so I bought it.

Less Than $60.00 Blind Bearing Puller Set

Less Than $60.00 Blind Bearing Puller Set

I made a collar so I could use the blind puller to remove the outer race. It cost me $7.00 in parts. I used it to remove on of the outer races and it worked nicely. So, if you have a set of blind bearing pullers, or buy a set like I did, you can remove the outer race by making your own collar.

Washer Rests On Edge Of Tube That Holds The Bearing

Washer Rests On Edge Of Tube That Holds The Bearing

Blind Bearing Puller With Jaws Ready To Extract Outer Race

Blind Bearing Puller With Jaws Ready To Extract Outer Race

Sealed Bearing Disassembled

FAG Sealed Bearing Disassembled During Removal

Here is a link to the documentation I wrote about how I did this work.

I also made a short video and posted it to my YouTube channel.

1983 BMW R100RS Remove Drive Shaft

I’m going to powder coat the swing arm so I need to remove the drive shaft. BMW used two different drive shaft designs on the airheads changing the design in the 1981 model year. This 1983 RS has the second design drive shaft.

Pre-1981 Drive Shaft and Swing Arm

Pre-1981 Drive Shaft Components and Swing Arm

Pre-1981 Driveshaft With Tapered End That Shrink Fits Into Bell Coupling

Pre-1981 Drive Shaft With Tapered End That Shrink Fits Into Bell Coupling

Drive Shaft Assembly Components

1981+ Drive Shaft Assembly Components

1981+ Drive Shaft Torsional Shock Absorption Assembly

1981+ Drive Shaft Torsional Shock Absorption Assembly

Cycle Works makes tools to remove the drive shaft. So they have two different tools.

Cycle Works Driveshaft Removal Tool 1955-1980

Pre-1981 Cycle Works Drive Shaft Bell Housing Removal Tool

Pre-1981 Cycle Works Drive Shaft Bell Housing Removal Tool

Here is a link to the description of this tool.

Cycle Works Driveshaft Spring Compressor Tool 1981+

This the tool used to compress the drive shaft spring so I can remove the snap ring that secures large yoke with the bell coupling from the drive shaft.

1981+ Cycle Works Drive Shaft Removal Tool Components

1981+ Cycle Works Drive Shaft Removal Tool Components

Here is a link to the tool description.

I documented how I did this work here:

And, I made a video showing assembly of the Cycle Works drive shaft spring compressor tool and how I used it to remove the drive shaft.