1973 R75/5 Rebuild: New Oil Pan Gasket and Camshaft Seal

Both of these showed signs of leaking oil and I replaced them.  You can read about how I did this here:

When replacing the oil pan gasket, I also cleaned the oil pickup screen and checked to be sure the bolts holding the pickup are tightened to the proper torque, 72 INCH/Pounds, not FOOT/Pounds.  I used an INCH/Pound torque wrench on them and also on the oil pan bolts which were set to 70 INCH/Pounds in several stages.  These bolts are easy to strip out unless you use an INCH/Pound torque wrench.

I put in new points and a condenser when I replaced the cam shaft seal and replaced the timing plate machine screws with two Allan head cap screws, M4x0.7×10. Now its easy to adjust the timing plate points cam with the centrifugal advance weights installed with a small Allan head wrench. And, I won’t be wallowing out the slot on machine screws as happened in the past.

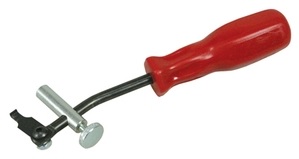
I used my larger adjustable seal puller to remove the camshaft seal, but it makes me nervous since the camshaft seal is small and I don’t want to score the camshaft. After I got the camshaft seal pulled, I looked for a puller for small seals. I found a very promising one, Lisle 58430 shaft seal puller. It’s available at some auto parts stores, but I ordered mine from Amazon.

Lisle_58430SealPuller

Lisle 58430 Shaft Seal Puller

I think this will work very well on future seal pulling jobs.


Here are a few pictures of the work.

Replacing Oil Pan Gasket

Engine on Side to Remove Oil Pan

Engine on Side to Remove Dirty Oil Pan

Permatex Gasket Remover Soaking In

Permatex Gasket Remover Soaking In

Checking Torque (72 INCH/pounds) on Oil Pickup Bolts

Checking Torque (72 INCH/pounds) on Oil Pickup Bolts

Clean Pan Mating Surface

Clean & Polished Pan Mating Surface

Clean Oil Pan with New Pan Gasket

Clean Oil Pan with New Pan Gasket

Replacing Camshaft Seal

Leaking Cam Shaft Seal

Leaking Cam Shaft Seal

Points Plate

Points Removed and Timing Plate Ready to Remove

Old Seal

Old Seal

Driving Cam Shaft Seal

Driving Cam Shaft Seal with 5/8 Inch Spark Plug Socket

New Points and Allen Head M4x10 Cap Screws

New Points and Allen Head M4x10 Cap Screws

1973 R75/5 Rebuild: Installing a New Clutch

I decided to replace the original clutch after inspecting it and measuring the parts. Many were close to, or past, the minimum thickness. You can read about the procedure I used to install the new clutch in this web page:

I ordered the new clutch parts from Tom Cutter at Rubber Chicken Racing Garage who sent me the following:

21 21 1 250 035 Diaphram Spring (Heavy Duty)
21 21 1 251 801 Pressure Plate
21 21 1 236 332 Clutch Plate
21 21 1 231 666 Compression Ring
21 21 1 231 463 Filister Head Cap Screw (6)

Here are a couple of the pictures included in write-up.

Old (top) & New Clutch Parts

Old (top) & New Clutch Parts, Inside to outside, Left-to-Right

.

Supplies and Special Tools to Mount the Clutch

Toothpick Application of Thin Layer of Honda 60 Molypaste to Edge of Fingers of Diaphragm Spring

Toothpick Application of Thin Layer of Honda 60 Molypaste to Edge of Fingers of Diaphragm Spring

Clutch Diaphragm Spring Against Face of Flywheel

Clutch Diaphragm Spring Against Face of Flywheel

New Clutch Bolts and Long Bolts

New Clutch Bolts Inserted and Long Bolts Ready to be Removed.

Transmission Aligned with Engine

Transmission Aligned and Tight to the Engine Clutch Housing

1973 R75/5 Rebuild: Remove/Install Flywheel, Replace Rear Main Seal, Oil Pump Cover and O-ring

I posted a new page on removing the flywheel, replacing the rear main seal, oil pump cover and cover o-ring and installing the flywheel. This also covers a repair to a leak I found in one of the crankshaft flywheel bolt holes.

The work I did was guided by a lot of advice and web content shared by others who have gone before me.  I’d like to acknowledge folks who regularly participate on the BMW Airhead forum on Micapeak.  In particular, Tom Cutter who runs  Rubber Chicken Racing Garage and Bob (Snowbum) Fleischer who has a great technical library on all things BMW motorcycles, answered questions I posted on the Micapeak forum and in personal Email and phone conversations.  I also used web materials posted on  Duane Ausherman’s site.

Here a few pictures from the write up.

Make-do Engine Stand

Make-do Engine Stand

10mm Long Bolt in Alternator to Block Crackshaft

10mm Long Bolt in Alternator to Block Crackshaft

Flywheel Bolts out And Oil Leaking

Flywheel Bolts Out And Oil Leaking From Crankshaft Hole

Removing Oil Pump Cover with Impact Driver

Removing Oil Pump Cover with Impact Driver

Tightening Bolt to Pull Rear Main Seal

Tightening Bolt to Pull Rear Main Seal

Heated to 220 F

Heating Flywheel Bolt Circle to 220 F Prior To Installation

1973 R75/5 Rebuild: Clutch Removal and Inspection

After I had removed the engine, I removed the clutch to inspect it.  Based on the inspection and information I found on  Duane Ausherman’s site, I decided to replace the entire clutch.

Here is the web page I wrote up on removing and inspecting the clutch.

I’ll document the installation of a new clutch when I complete the work in another web page.

I’d like to acknowledge folks who regularly participate on the BMW Airhead forum on Micapeak.  In particular, Tom Cutter who runs  Rubber Chicken Racing Garage and Bob (Snowbum) Fleischer who has a great technical library on all things BMW motorcycles, answered questions I posted on the Micapeak forum and in personal Email and phone conversations.  Their knowledge makes the life of a “hobbyist”, such as I, less stressful and much more fun.

Here are a couple of pictures from the web page writeup.

Bar Preventing Rotation When Removing Clutch Bolts

Bar Preventing Rotation When Removing Clutch Bolts

Backing Off Clutch Pressure 1/2 Turn Per Bolt at a Time

Backing Off Clutch Pressure 1/2 Turn Per Bolt at a Time

Clutch Parts Order: Bottom Clutch Pressure Ring, Top Clutch Diaphragm Spring

Clutch Parts Order: Bottom Clutch Pressure Ring, Top Clutch Diaphragm Spring

Diaphragm Spring Finger-Wear on Edges

Diaphragm Spring Finger-Wear on Edges

Clutch Pressure Plate Facing Engine Showing Grooves from Diaphragm Spring

Clutch Pressure Plate Facing Engine Showing Grooves from Diaphragm Spring

1973 R75/5 Rebuild: Progress Report #2

I thought I would provide a progress report on this project.  There has been a lapse in my posts.  My wife and I spend six weeks in Europe (all of June) with three of those weeks engaged in “applied motorcycling” as we rode on two guided motorcycle tours.  The first was in eastern Europe riding in parts of the former Yugoslavia, Bulgaria and Albania. Here’s my trip report, A Motorcycle Tour of Eastern Europe: “Combat Touring” in the Balkans.  And the second was in the Pyrenees and I’ll be posting a trip report on that ride soon.

After returning, there were a number of things to get on top of including a major landscaping project, and all of a sudden, it’s early August. I finally got back into the shop this week and started by reviewing what I had completed so far (see the work plan below).

I was able to remove the clutch and flywheel just before I left for Europe. Upon inspection of the clutch, I decided to replace it. I ordered the parts from Tom Cutter at Rubber Chicken Racing Garage and they came in just before I left. I’ll start work on replacing the rear main seal and oil pump cover o-ring and then getting the flywheel and clutch back into the engine block and I’ll post a web page on that work soon.

I decided to go back to the carburetors and replace the screws on the top covers with new stainless steel ones. Some of the slots in the screws had been enlarged so time to get that taken care of.  And, I wanted to add the spring on top of the slide that was included staring in 1977. I’ve heard this improves smoothness and I did the same upgrade to the carburetors in the R75/6 project.  I’ll update the carburetor rebuild page to include this.

Here’s the spring and how I installed it.

Carburetor Spring

1977 Carburetor Spring

Carburetor Spring

Carburetor Spring on Top of  Slide

Spring Installed

Spring Installed Between Slide and Top

I also tried a little trick to ensure the throttle screws on both carburetors are just touching the tab on the throttle shaft. I slipped a piece of paper between the tab and the top of the adjusting screw and then tightened the screw until I could just feel the drag on the paper. I always have a hard time ensuring the screws are evenly touching the tab when the carburetors are mounted, so this way they are even before I install them.

Using Paper To Adjust Throttle Screw

Using Paper To Adjust Throttle Screw So it Just Touches the Tab

Here is the progress on the task list so far.  The good news is there are more check marks since the last report in March.  But, there are still quite a few tasks to keep me busy 🙂

Front Wheel
Remove fairing
Repair fairing
Stip fairing
Paint faring
Remove fender
Strip fender
Paint fender
Remove brake cable
Remove front wheel
Remove tire and tube
Remove spokes
Clean & polish wheel and rim
Install new spokes OR clean old and install
Inspect brakes
Replace brake shoes
Inspect wheel bearings
Inspect, Replace wheel bearings if needed
Grease wheel bearings
Replace tire and tube
Balance
Mount
Replace brake cable
Adjust front brake
Rear Wheel
Remove rear fender
Strip rear fender
Paint rear fender
Remove rear wheel
Remove tire and tube
Remove spokes
Clean & polish wheel and rim
Install new spokes OR clean old and install
Remove Rear Drive
Clean & Polish
Inspect rear brake shoes
Replace brake shoes
Inspect wheel bearings
Inspect, Replace wheel bearings if needed
Grease wheel bearings
Clean & polish wheel and  rim
Install new spokes
Replace tire and tube
Balance
Install rear wheel
Lube rear drive splines
Adjust brakes
Front Fork
Remove handlebars
Remove headlight
Clean and repair paint
Install headlight
Remove triple clamp
Inspect steering head bearings
Replace steering head bearings
Install new bearings/races
Reassemble steering head
Install and align forks
Drain and Remove forks
Disassemble forks
Replace all rubber o-rings, bushings, etc.
Reassemble forks
Controls
Remove rider foot pads
Remove brake cable
Remove clutch cable
Remove throttle cables
Remove choke cables
Remove handlebar grips
Remove handlebar controls
Powder coat handle bar perches
Strip switch brackets
Paint switch brackets
Remove handle bars
Replace handlebars
Polish mirrors
Polish control  levers
Install handle bars
Install handlebar controls
Install brake cable
Install clutch cable
Install throttle cable
Install handlebar grips
Engine, Clutch
Remove Carbs
Rebuild carbs
Clean & polish air tubes
Clean & polish hose clamps
Remove air box halfs
Clean and polish air box halfs
Remove starter cover
Clean and polish starter cover
Remove valve cover
Remove head
Remove cylinder
Rebuild head
Remove piston
Remove rings
Remove engine
Clean piston
Measure cylinder bore
Gap new rings
Install new rings
Remove clutch
Inspect clutch for wear and condition
Replace clutch
Remove flywheel
Refresh paint on timing marks
Replace Rear Main Seal
Repair Oil Leak in Flywheel Bolt Hole
Replace Oil Pump Seal
Install flywheel
Assemble & Install clutch
Remove oil pan
Clean & polish oil pan
Inspect screen
Install new pan gasket
Replace cam shaft seal
Clean and polish engine case
Clean top cover
Clean front cover
Install cylinder base gasket
Install push rod tube bushings
Install cylinders
Install pistons
Install head gasket
Install heads
Set valves
Install valve cover gasket
Install valve covers
Install carbs
Balance carbs
Set timing
Transmission
Remove transmission
Clean and inspect
Replace clutch throw-out felt, gaskets, seals
Lube splines
Install transmission
Install new speedometer cable
Install new clutch cable
Tank
Remove tank
Strip tank
Paint tank
Remove petcocks
Rebuild petcocks
Install petcocks
Install tank
install new fuel lines
Install new air cleaner
Install air box and starter cover
Frame
Remove seat
Remove side panes
Strip and paint side panels (Blue Stripes)
Remove front foot pegs
Polish pegs
Install footpeg rubbers
Remove rear foot pegs
Polish pegs
Install footpeg rubbers
Remove side stand
Clean, polish side stand
Remove center stand
Remove shocks
Clean and polish shocks
Clean and polish shock covers
Powder coat shock springs
Remove battery box
Powder coat battery box
Remove battery
Replace battery
Replace (+) and (-) cables
Remove rear frame
Powder coat rear frame
Remove Rear Turn Signals & Tail light
Clean and polish turn signals
Strip tail light
Paint tail light
Replace turn signal stalk
Remove swing arm
Powder coat swing arm
Replace swing arm bearings
Remove electrics
Remove wiring harness
Remove headlight shell
Powder coat frame
Powder coat sub-frame
Powder coat battery box
Powder coat license plate braket
Powder coat center stand
Powder coat swing arm
Assemble center stand
Assemble electrics
Mount wiring harness
Mount engine in frame
Mount side stand
Assemble oil filter and cover
Mount transmission to engine
Lube output shaft splines
Mount swing arm
Mount rear drive
Assemble rear frame
Assemble shocks
Mount Seat